Setting up a working pipeline for WinUI is difficult. There are some guidelines available online, but none of them worked for us. Guidelines that are available online do not provide enough details. That is why we have decided to share our working CI pipeline with all additional notes that might save you a lot of time and avoid the struggles while setting it up. Please note that there is no guarantee that it will work with your system. However, we tried to write this guideline as clearly as possible with all additional details. We have tested the whole process from scratch, and it works in our environment. Try to copy it precisely or use it as a source of inspiration for creating your own CI pipeline.
You will find how to create a CI (continuous integration) pipeline for the Microsoft WinUI Desktop application in Microsoft Azure DevOps Environment. Plus, we will show you what to pay attention to in settings in Visual Studio and what problems there might be with certificates or secret passwords.
Steps in the process of making the CI pipeline for WinUI
- Create a WinUI solution with a project and double-check properties in your WinUI project in Visual Studio 2022
- Make sure you are using GIT at Repos from Azure DevOps
- Make sure that you have created and uploaded a certificate for package signing
- Add passwords for package signing to DevOps
- Create a CI pipeline in Azure DevOps for your WinUI project with .msix package
- Share this article with your IT friends
Step 1 - Create a WinUI solution with a project and double-check properties in your WinUI project in Visual Studio 2022
Create a new WinUI project in Visual Studio (WinUI Desktop, Packaged) Our solution is called Moworks-WinUI-Blank.
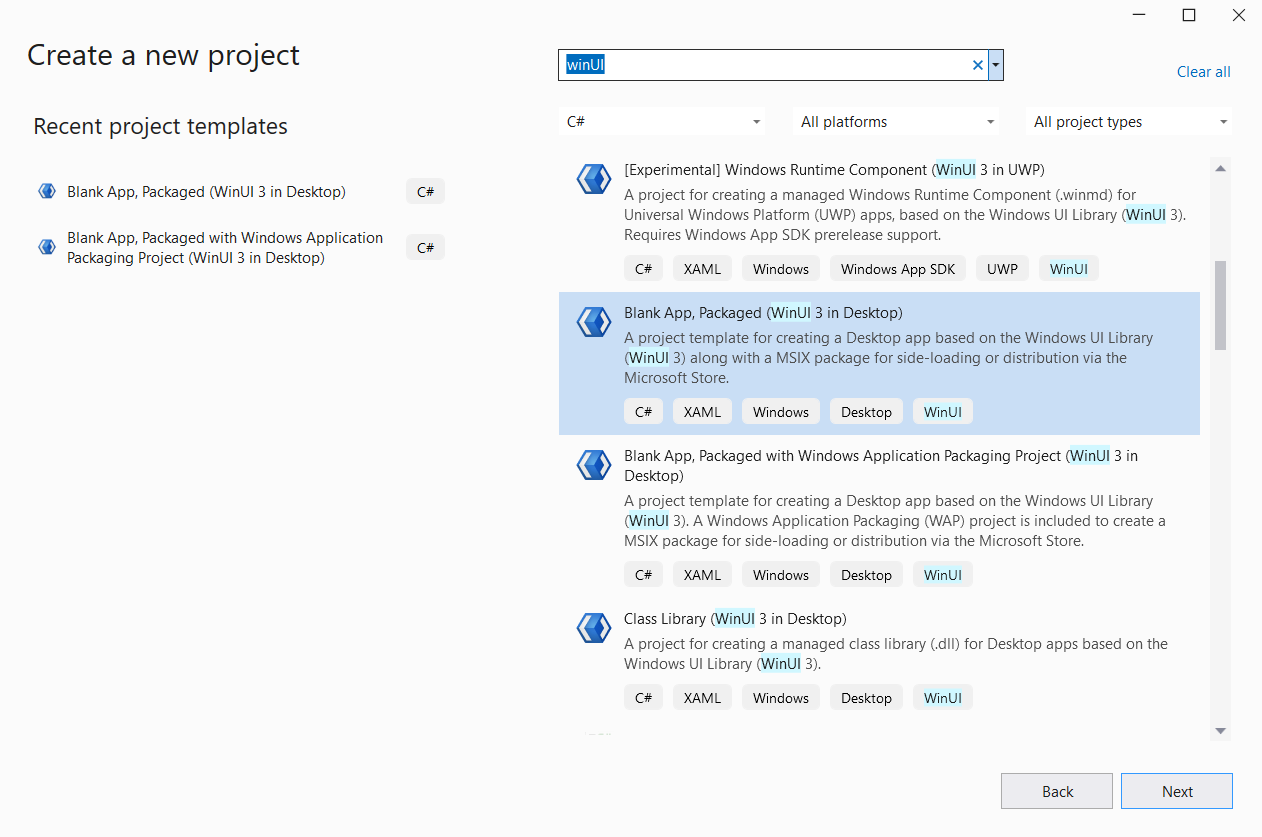
One of the problems you might have while creating the CI pipeline is that your WinUI project does not have compatible versions of packages.
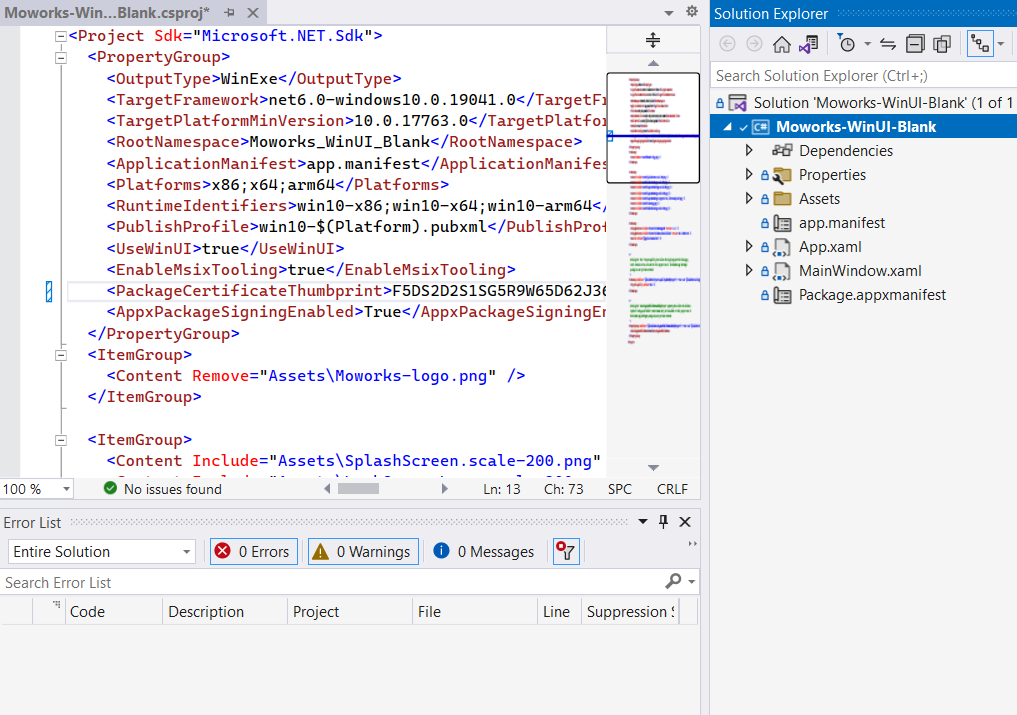
Parameters you want to double-check in Visual Studio 2022
- Build platform x64
- Target framework should be net6.0-windows10.0.19041.0
- dotnet version 6.0.900
Step 2 - Make sure you are using Git at Repos from Azure DevOps
Now, as you have created a new solution with a project, you can connect it to Azure DevOps. Create a new project in Azure DevOps. After that, you can create a Git repository directly from Visual Studio.
Git -> Create a Git repository -> Azure DevOps
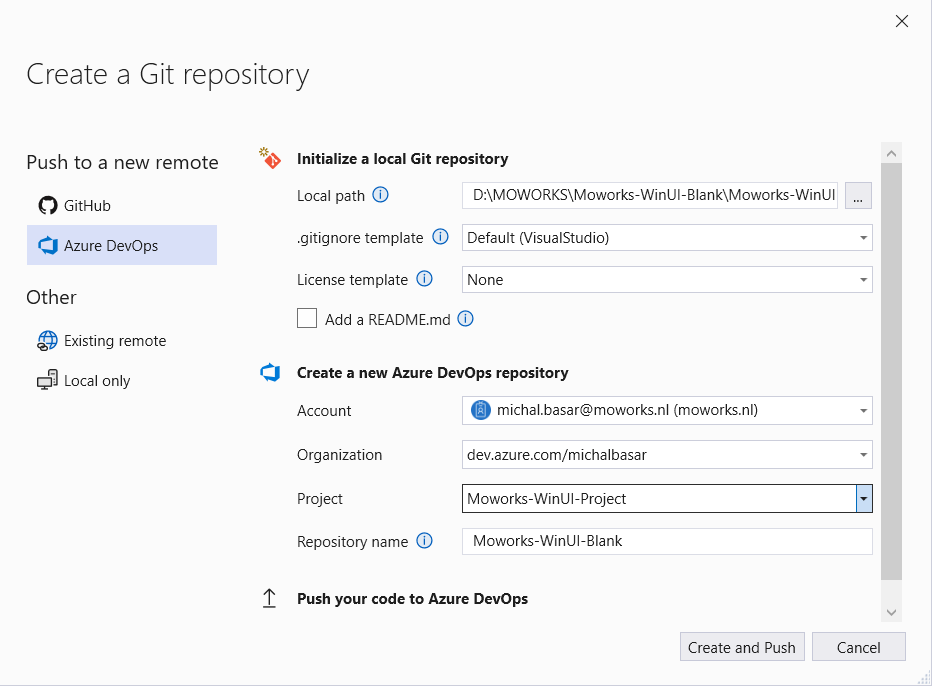
We use Azure Repose Git to get our code from Visual Studio. We believe that it works in the same way with Github or other Git platforms, however we have not tested it.
Step 3 - Make sure you have created and uploaded certificate for package signing
If you are advanced engineer, you probably know how to set it up. In case you do not know, please visit Microsoft - create a self-signed certificate.
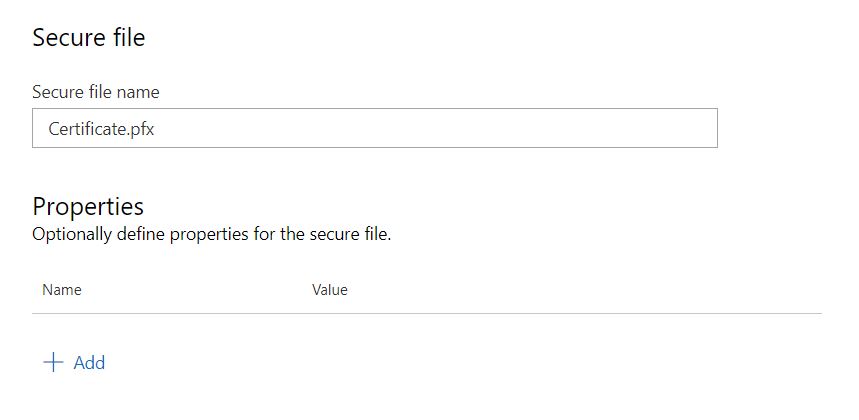
Once you have your certificate in .pfx format, upload it to "Secured files" in Azure DevOps:
Azure DevOps -> Pipelines -> Library -> Secure files -> add Secure file
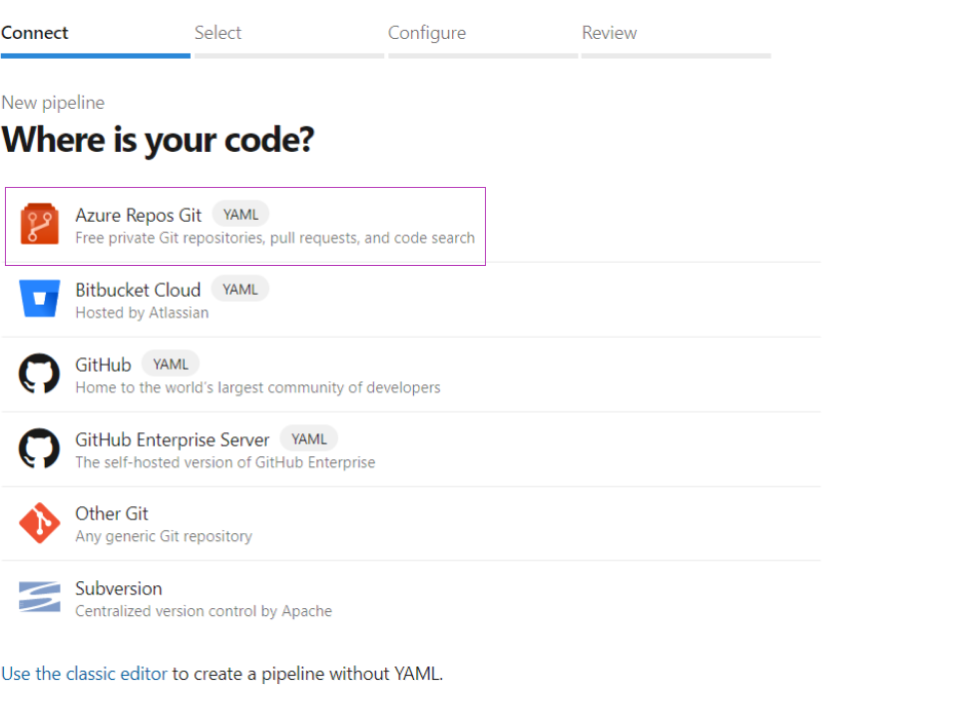
Step 4 - Create a CI pipeline in Azure DevOps for your WinUI project with .msix package
Create a new pipeline with your code from the option called: Azure Repos Git (YAML). From "Configure your pipeline" select something, it does not matter what you choose as you want to delete all the pre defined code from the YAML pipeline file to see a blank page. When writing code to YAML file, pay extra attention to the spacing in each line. It it very important how much space you keep empty. If you see some red lines, it might be caused exactly by incorrect spacing. Learn how spacing works, or just try hard, until you set it right.

Okey, now that you know more about spacing and potential issues related to it, let's start with the actual coding. Once your YAML file is blank, fill it in with the code below
Trigger and pool
Here you define what is the trigger for the CI pipeline and what kind of operation system will be installed on virtual machine created for the pipeline.
trigger:
- master
pool:
vmImage: windows-2022
demands:
- MSBuild
Define variables
We use variables to keep our code nice looking. Change the values, or names below so it correspond to your project (solutionName, certificateFile, value in certificatePassword, downloadURL). Make sure that targetFramework correspond to the target framework in your WinUI project. Also, make sure that dotNet version in your project is the same as dotNetVersion in the pipeline (in this case 6.0.900).
variables:
buildPlatform: 'x64'
buildConfiguration: 'Release'
targetFramework: net6.0-windows10.0.19041.0
major: 1
minor: 0
build: 0
revision: $[counter('rev', 0)]
solutionFolder: '.'
sourceFolder: '$(solutionFolder)\src'
solutionName: 'Moworks-WinUI-Blank'
solutionFile: $(solutionName).sln
projectName: $(solutionName)
manifestFolder: '$(sourceFolder)\$(projectName)'
manifestFile: 'Package.appxmanifest'
packageProjectFile: '$(projectName).csproj'
packageSolution: $(manifestFolder)\$(packageProjectFile)
appFolder: $(sourceFolder)\$(projectName)
appProject: $(appFolder)\$(packageProjectFile)
appPackageFolder: AppPackages
appVersion: $(major).$(minor).$(build).$(revision)
appPackageVersionFolder: $(projectName)_$(appVersion)_$(buildPlatform)_Test
msixFileName: $(projectName)_$(appVersion)_$(buildPlatform).msix
msixFilePath: $(Build.ArtifactStagingDirectory)\$(appPackageFolder)\$(appPackageVersionFolder)\$(msixFilename)
dotNetVersion: 6.0.900
certificateFile: Certificate.pfx
certificatePassword: $(CertSecret)
downloadUrl:https://your-website.your-website/Download
Store password from certificate to variables
Now, store the password for your certificate securely right in the pipeline. Click on "Variables" next to "Run" button on the top right side of the screen (in the YAML pipeline). Put name of .pfx file into "Name" and store password to "Value".
note* It is possible to skip this process and add password directly to your pipeline yaml file, however, do not do it, it is not a save option. Someone could potentially find password somewhere online. The save way is to use variable groups and store passwords there.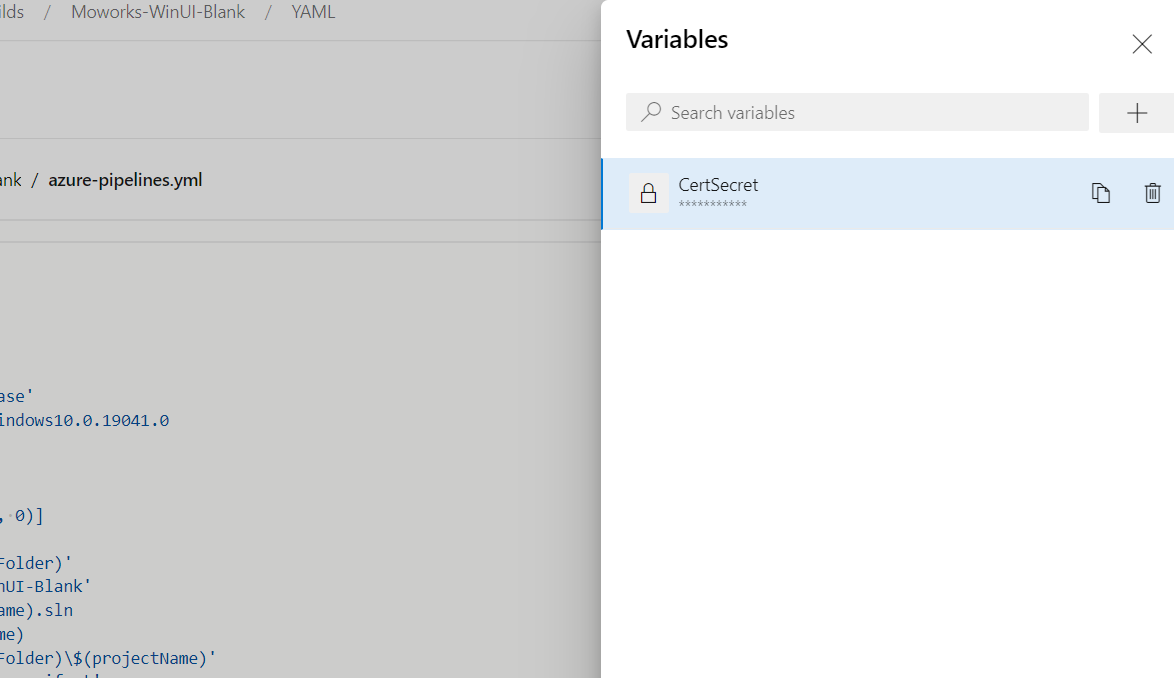
Define package version
This step takes care of incrementing the version number of our package.
steps:
- powershell: |
[xml]$manifest= get-content ".\$(manifestFolder)\$(manifestFile)"
$manifest.Package.Identity.Version = "$(major).$(minor).$(build).$(revision)"
$manifest.save("$(manifestFolder)/$(manifestFile)")
displayName: 'Version Package Manifest'
Restore nuget packages
Restoring nuget packages.
- task: Bash@3
displayName: Restore nuget
inputs:
targetType: 'inline'
script: |
dotnet restore $(solutionFile)
Download secure file
Certificate that we uploaded earlier will be installed in this step.
- task: DownloadSecureFile@1
name: signingCert
displayName: 'Download Secure PFX File'
inputs:
secureFile: '$(certificateFile)'
Building the solution and creating the package.
A reguest for our build
- task: MSBuild@1
inputs:
platform: '$(buildPlatform)'
solution: '$(packageSolution)'
configuration: '$(buildConfiguration)'
msbuildArguments: '/p:AppxBundlePlatforms="$(buildPlatform)"
/p:AppxBundle=Never
/p:UapAppxPackageBuildMode=SideLoadOnly
/p:AppxPackageSigningEnabled=false
/p:GenerateAppInstallerFile=false
/p:GenerateAppxPackageOnBuild=true
/p:AppInstallerUri=$(downloadUrl)
/p:AppInstallerCheckForUpdateFrequency=OnApplicationRun
/p:AppInstallerUpdateFrequency=1
/p:AppxPackageDir=$(Build.ArtifactStagingDirectory)\$(appPackageFolder)\
/p:PackageCertificateThumbprint=""
/p:PackageCertificatePassword=$(certificatePassword)
/p:PackageCertificateKeyFile="$(signingCert.secureFilePath)"'
displayName: 'Package the App'
Copy files into artifact staging directory
Our .msix package was created in the prevous step. However, we have to copy the files to ArtifactsStagingDirectory in order to acces them.
- task: CopyFiles@2
displayName: 'Copy Files to: $(Build.ArtifactStagingDirectory)'
inputs:
SourceFolder: '$(System.DefaultWorkingDirectory)'
Contents: '**\bin\$(BuildConfiguration)\**'
TargetFolder: '$(Build.ArtifactStagingDirectory)'
Signing the certificate
There is plenty of possible signing methods available on the internet. Some of them have bugs and gives our package an error. Signing certificate belows works the best for this solution.
*Please, note that line with this script should be in one line:- script: '"C:\Program Files (x86)\Windows Kits\10\App Certification Kit\SignTool" sign /fd SHA256 /f $(signingCert.secureFilePath) /p "$(certificatePassword)" $(msixFilePath)'
- script: '"C:\Program Files (x86)\Windows Kits\10\App Certification Kit\SignTool" sign /fd SHA256 /f $(signingCert.secureFilePath) /p "$(certificatePassword)" $(msixFilePath)'
displayName: Sign MSIX Package
Publishing the build and creating a drop
Finally, this task make sure that your build will be published as a drop in artifact stagin directory.
- task: PublishBuildArtifacts@1
displayName: 'Publish Artifact: drop'
inputs:
PathtoPublish: '$(Build.ArtifactStagingDirectory)'
Enter your package from artifact staging directory
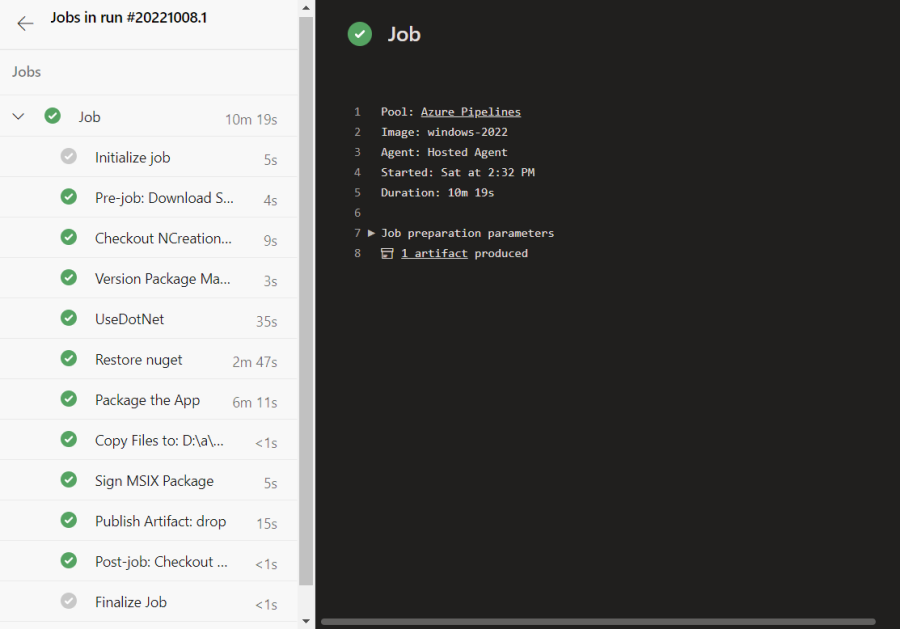
Once your pipeline have run sucesfully, you can get your package from artifact staging directory.
Go to Pipelines -> Pipelines -> and click on your pipeline in "Recently run pipeline' -> click on the pipeline again and you will see details for your run.
In the section "related" click on "1 published" and you will see your drop folder with your package. Your drop is also available in the step view for your pipeline as the picture below shows
Full YAML code from Moworks CI Pipeline for Packaging WinUI Desktop app
trigger:
- master
pool:
vmImage: windows-2022
demands:
- MSBuild
variables:
buildPlatform: 'x64'
buildConfiguration: 'Release'
targetFramework: net6.0-windows10.0.19041.0
major: 1
minor: 0
build: 0
revision: $[counter('rev', 0)]
solutionFolder: '.'
sourceFolder: '$(solutionFolder)\src'
solutionName: 'Moworks-WinUI-Blank'
solutionFile: $(solutionName).sln
projectName: $(solutionName)
manifestFolder: '$(sourceFolder)\$(projectName)'
manifestFile: 'Package.appxmanifest'
packageProjectFile: '$(projectName).csproj'
packageSolution: $(manifestFolder)\$(packageProjectFile)
appFolder: $(sourceFolder)\$(projectName)
appProject: $(appFolder)\$(packageProjectFile)
appPackageFolder: AppPackages
appVersion: $(major).$(minor).$(build).$(revision)
appPackageVersionFolder: $(projectName)_$(appVersion)_$(buildPlatform)_Test
msixFileName: $(projectName)_$(appVersion)_$(buildPlatform).msix
msixFilePath: $(Build.ArtifactStagingDirectory)\$(appPackageFolder)\$(appPackageVersionFolder)\$(msixFilename)
dotNetVersion: 6.0.900
certificateFile: Certificate.pfx
certificatePassword: $(CertSecret)
downloadUrl:https://your-website.your-website/Download
steps:
- powershell: |
[xml]$manifest= get-content ".\$(manifestFolder)\$(manifestFile)"
$manifest.Package.Identity.Version = "$(major).$(minor).$(build).$(revision)"
$manifest.save("$(manifestFolder)/$(manifestFile)")
displayName: 'Version Package Manifest'
- task: Bash@3
displayName: Restore nuget
inputs:
targetType: 'inline'
script: |
dotnet restore $(solutionFile)
- task: DownloadSecureFile@1
name: signingCert
displayName: 'Download Secure PFX File'
inputs:
secureFile: '$(certificateFile)'
- task: MSBuild@1
inputs:
platform: '$(buildPlatform)'
solution: '$(packageSolution)'
configuration: '$(buildConfiguration)'
msbuildArguments: '/p:AppxBundlePlatforms="$(buildPlatform)"
/p:AppxBundle=Never
/p:UapAppxPackageBuildMode=SideLoadOnly
/p:AppxPackageSigningEnabled=false
/p:GenerateAppInstallerFile=false
/p:GenerateAppxPackageOnBuild=true
/p:AppInstallerUri=$(downloadUrl)
/p:AppInstallerCheckForUpdateFrequency=OnApplicationRun
/p:AppInstallerUpdateFrequency=1
/p:AppxPackageDir=$(Build.ArtifactStagingDirectory)\$(appPackageFolder)\
/p:PackageCertificateThumbprint=""
/p:PackageCertificatePassword=$(certificatePassword)
/p:PackageCertificateKeyFile="$(signingCert.secureFilePath)"'
displayName: 'Package the App'
- task: CopyFiles@2
displayName: 'Copy Files to: $(Build.ArtifactStagingDirectory)'
inputs:
SourceFolder: '$(System.DefaultWorkingDirectory)'
Contents: '**\bin\$(BuildConfiguration)\**'
TargetFolder: '$(Build.ArtifactStagingDirectory)'
- script: '"C:\Program Files (x86)\Windows Kits\10\App Certification Kit\SignTool" sign /fd SHA256 /f $(signingCert.secureFilePath) /p "$(certificatePassword)" $(msixFilePath)'
displayName: Sign MSIX Package
- task: PublishBuildArtifacts@1
displayName: 'Publish Artifact: drop'
inputs:
PathtoPublish: '$(Build.ArtifactStagingDirectory)'
Final Words
We have tested our guidline by creating a WinUI desktop application, and following all the steps from the guidline. Therefore we believe and hope you will run the pipeline with success.
If you found this guidline helpful, please share it with your team. Be sure to stay connected with us, to find more valuable content.
Michal Basar